A guest post from our friend at HarvestLiberty.net.
As a child I went often with Papa Bear and Small Bear on The Big Honey Hunt. Over river and through dale I laughed and laughed as Papa Bear chased his bee, sticking his paw into every tree but the honey tree. Back then it never troubled me that the final message of the book was this: “The best sort of honey never comes from bees. It comes from a store. I would like some, please” (1). As a kid, that worked for me. Everything in our pantry came from the Pennington Quality Market, so it seemed entirely appropriate that Papa Bear and Mama Bear shopped there too. After all, these Berenstain Bears were clothed, operated power tools, drove cars: their domestication began long before my childhood.
But reading the same book (and I mean the exact same book, tape on the spine and all) to my children, I found the ending not only misleading but entirely disappointing — such a flat out lie that I slapped the book shut in disgust. By 1962 when the book was written were we really already that far down the industrialized food, transcendence-from-environment rabbit hole? Or perhaps it was those very messages, “Bees don’t make honey,” (and, by the way, “War is love”), read into children’s ears nightly for decades that propelled us down in the first place.
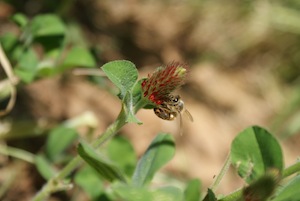
Regardless, I am here today to confirm that in truth, honey does come from honey bees! In joyful rebellion against large-scale agriculture and husbandry, it is my pleasure to share with you the steps my family follows to harvest honey from our single hive of apis mellifera ligustica. The entire process takes about three to four hours, so be sure to budget enough time. It’s much easier to do it all in one fell swoop.
Tools
- Beekeeper’s Suit, Hat and Gloves (or Balls of Steel and a Touch of Insanity)
- Smoker
- Hive Tool
- Bee Brush
- Heavy Blanket or Sheet
- Wheelbarrow or Yard Cart
- Honey Extractor (or Gravity, Time and Heat)
- Fork
- Strainer
- Bucket with Pour Valve
Materials
- Dried Sumac or Pine Needles
- Sheet of Newspaper or Other Computer Paper
- Lighter or Matches
- Glass Jars (in 4 ounce, 8 ounce and 1-2 pound sizes)
- Soap & Hot Water
- Labels
Steps
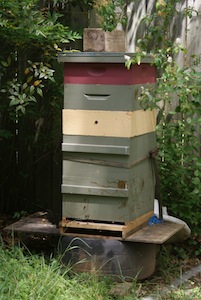
1. Check your intention and remember your place as beekeeper. Harvesting honey feels a bit like robbing the night train. I have not carried nectar and pollen. I haven’t formed honeycomb or made any honey myself. The honey quite clearly belongs to the bees. Because of this perhaps the most important step to take is setting your intention. For us, that looks something like this: “We intend to maintain a symbiotic relationship with our bees.” From this flows a give-give pattern. We do our human part, initially setting up the outer hive structure, and then protecting the hive from Papa Bear and other dangers such as mites or hive beetles. We help the hive button down the hatches in the winter and stay cool in the summer. By harvesting some honey, we help steady the population of the hive and prevent swarming. The bees do their part with their gifts of honey and pollination. And yes, we humans are getting a hell of a deal.
2. Determine whether the hive is robust enough for harvest. Most hives need two years to become robust enough to sustain a harvest. During those two years, the bees will be busy pulling out comb, hatching brood and producing enough honey to feed their growing numbers. Early on you may need to help your bees through their first hot summer and cold winter by feeding them sugar water. This is not ideal: it’s akin to a human consuming only soda; and we all know the health problems that a steady diet of corn syrup brings. So it’s important to make sure your hive gets enough to eat of the food they produce for themselves before you start taking any. In the Piedmont of North Carolina, most beekeepers harvest from June – early August. Without getting into the more detailed examination in #7 below, you may be able to determine the presence of honey by weight alone. Honey is heavy! If your honey super is markedly heavier than it was when you installed it, there’s a good chance you have honey.
3. Work with the nectar flow. Like harvesting any crop, it’s important to work with Nature’s cycles. Honey production mirrors the nectar flow. Be observant of seasonal changes in your locale: changes in weather can disrupt or accelerate plant and tree flowering and thus the flow of nectar. For example, high temperatures in early Spring can lead to an explosion of nectar much earlier than usual, translating to record honey production and a need to harvest earlier in the season. Also note that as the growing season rolls out here our honey tends to change in color from a very light golden to a darker amber. When you begin to notice the darker honey being produced by your hive, that can be a clue that the nectar supply is winding down and your bees may not be able to make as much going forward. Your goal is to leave enough honey for the hive to make it through the winter, which can typically be achieved by leaving them all the honey mixed in with brood in the large brood boxes and taking only the honey in the smaller honey supers. We will also leave for our bees any honey in the honey super that isn’t fully capped or any frames that aren’t full, typically holding those frames out for them until the lean winter months.
4. Assemble and clean your equipment. Have everything ready to go and in place where you expect to use it before you start to harvest. Sterilize the honey jars, the honey bucket, fork and strainer by washing with soap and hot water or by using a dishwasher, preferably one with a sterilize cycle. Your extractor should be stored with a sheet or other cover on top to keep it free of dirt and debris so it shouldn’t need any cleaning after you follow the final step below, but if necessary it can also be cleaned by running hot, soapy water through it, followed by hot or boiling water to rinse. Honey flows best when the air temperature is warm and when you can allow gravity to do its job by placing the extractor higher than the honey bucket and the honey bucket higher than your glass storage jars. Consider these factors when deciding where to extract. Also consider a space that will offer protection from your bees.
5. Suit up. We recommend wearing full protection when working with bees, including the quintessential beekeeper’s white coverall suit, hat with netting to cover your face and neck, gloves and leather boots. Be sure to tuck the cloth end of the gloves into your sleeves and the cuffs of the suit into your boots. Note that while honey harvesting is a family affair, only the person working directly with the bees needs to suit up. Everyone else can simply think love and stay out of the way of the bees.
6. Smoke up. To calm the bees prior to working them use a cool, white smoke produced from the incomplete combustion of materials such as dried sumac or pine needles. The smoke prevents a triggering of the bees’ defensive response by masking alarm pheromones released by guard bees in response to the hive invasion or to bees killed during the work. Dried sumac may also have the added benefit of killing any mites in the hive. Using a smoker, first fill its metal chamber with burning newspaper or other paper. Light the paper and then drop it in the smoker, using your hive tool to stuff the burning paper down. Then add dried sumac or pine needles to the smoker, gently compressing the bellows to keep the fire smoldering and allow the combustible material to ignite. Filling the smoker full with the sumac or needles will insure you don’t run out of smoke half-way through your work. When there is sufficient smoke, close the lid on the smoker, forcing the smoke out the spout. Run smoke around the hive and through openings in the hive prior to working. Remove the top board and run smoke directly into the hive. Compressing the bellows will increase smoke output, forcing the smoke where you want it to go. Leave the smoker on the ground next to the hive while you work. Smoke the bees as needed throughout your work.
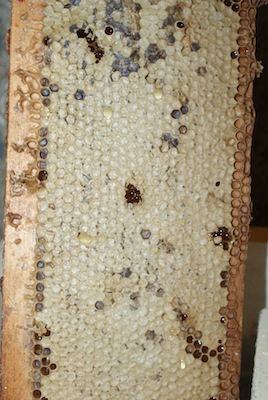
7. Make sure the honey is ripe. Bees preserve their honey in beeswax, building up the sides of the comb, then filling each cell with honey, and finally, capping each cell, again with beeswax. Working from the top honey super down, use your hive tool to pry out a frame. Check to see if the comb is pulled out, filled with honey and capped. If the first frame you check is full, continue working through the super to check each frame. If things are looking good for at least eight or so frames, it’s time to move on to #8 below. If not, return all the frames for safekeeping to the bee hive and check again in a few weeks.
8. Separate the bees from the honey. As you examine each frame, use your bee brush to gently brush any bees off of the honey comb. You may want to smoke each frame before doing this. Once you have removed the bees, quickly place the frame into your wheelbarrow or yard cart and cover it with a heavy blanket. Work gently but with speed through each frame. When you have pulled all of the frames with ripe honey immediately remove the honey from the scene of the crime to the place of extraction. Our bees were very docile for our first honey harvest and we were able to extract outdoors, but on the second harvest they demonstrated a decidedly heightened awareness of our actions and we had to move extraction operations inside.
9. Uncap the honey. Before beginning this first phase of extraction, wash your hands. If you have long hair, tie it back. There are fancy tools for uncapping, but we’ve found that a fork works perfectly. Gently rake the tines of the fork over the honey comb, pressing hard enough to score the cap of the comb but not so hard that you destroy the sides of the comb. You will know this step is complete when you see honey begin to trickle out. Remember to score the comb on each side of the frame. Uncap only as many frames as will fit in your extractor at one time.
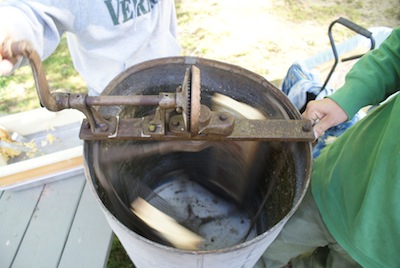
10. Extract. Extractors are very cool tools. They use centrifugal force to fling the honey from the honey comb onto the sides of the extractor. Gravity then does its job, sending the honey down the sides and into a pool at the bottom where it can pour out of a lower spigot.
Most extractors are sustainable tools, requiring only human power on their hand crank to set them spinning. They can be an expensive investment, with the smallest model running upwards of $400, so we recommend culling Ebay, Craig’s List and the like for a used extractor before buying new. Also consider sharing an extractor with other beekeepers. You can harvest without an extractor by scoring the comb and then propping up the frame in a bucket and letting gravity do its work. Some beekeepers speed up this type of harvest by crushing the comb and then straining it out. We prefer a method that does the least damage to the honey comb as the bees expend significant energy creating the comb. If they don’t have to do that work again all of their energy can go into filling the comb with honey.
Our extractor can process two frames at a time, but some are designed for three or four frames. It’s easiest to run the extractor when the frames are balanced, each sharing a comparable load of honey. Slide the frames into the metal rack or carriage and then simply crank the handle.
Beautiful strands of honey will flow from the frame to the sides of the extractor in a mesmerizing pattern. When the strands cease their weaving, allow the extractor to stop, then remove the frames and turn them over and repeat extraction on the second side. By holding up the frames to the light you can easily see that the honey has been pulled from the comb. When you have extracted honey from all of the frames, move on to #11.
11. Strain the honey. Place your honey bucket with the pour valve underneath the extractor’s spigot. Lay a strainer on the top of the bucket, directly under the spigot. Your strainer should be of a mesh that is wide enough to let the honey through but tight enough to catch bits of honeycomb. Then simply open the spigot and let gravity work.
12. Bottle the honey. Once all of the honey has been drained from the extractor, remove the strainer and elevate the honey bucket to a counter top or comparably high surface. Have one person fill the jars with honey while the other provides empty jars and caps full ones. Glass jars can be expensive, particularly if you are selling or gifting the honey and can’t recoup the jar use, but we prefer using glass jars because they can be utilized again and again and because honey looks beautiful in them. We use either traditional canning jars or jars purchased at our local beekeeper’s supply store. If you aren’t going to sell your honey you can also consider simply recycling free glass jars from jellies, sauces or the like. Take care to thoroughly clean the jars before storing honey in them. Weed out any jars that retain a food smell. Pickle jars and some garlicky sauce jars can retain the odor of their former contents and pass it on to the stored honey. Honey is sold in many different weights with the weight determined by container volume. We typically bottle our honey in four-ounce containers to give away as samples or gifts; and in eight-ounce or one-pound sizes to sell. It is also common for honey to be sold in one-quart or two-pound containers. The price for honey can vary significantly: ask at your local farmer’s market for the going rate of honey in your area.
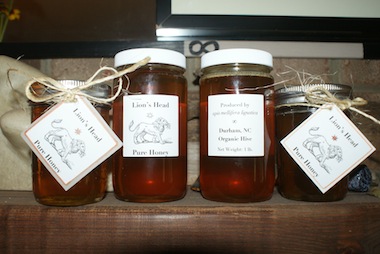
13. Label the honey. Labels can be as fancy or as low-key as you choose, and if you aren’t selling your honey, you can skip this step. Many beekeeping suppliers offer customized labels. You can also make labels by hand or on the computer using Avery Labels and templates. We prefer to make our own because it allows us to vary weights on each label. Note that honey is 1.5 times heavier than water, so a pint size glass jar (16 ounces) holds 24 ounces of honey.
Be sure to also include on your label information on ingredients (100% Pure Honey) and hive location. You may also add a name for the honey, the beekeeper’s name and the time of year the honey was harvested. Once bottled and labeled, honey will keep at room temperature quite nicely. If it begins to crystallize, simply place the jar in a pan of boiling water — another great reason to use glass jars.
Note that there is currently no consistent regulatory oversight or set of established guidelines for calling honey organic. Some argue that honey should be treated as we handle organic milk, with the burden falling on organic practices in animal-husbandry. Others believe that honey can’t be certified organic unless the bees’ flight range can be determined to contain only organic nectar sources. We strongly believe in using only organic practices to care for our bees and for all plants in our door yard, but living as we do in the middle of Durham, North Carolina, we can’t be certain our bees aren’t feeding on flowers or trees that have been sprayed with pesticides. We split the difference by putting on our label that our honey is from an “Organic Hive,” but we don’t call it “Organic Honey.”
14. Return any unused honey to the bees. I love this part: the bees do all the clean-up. Simply place the extractor, the honey bucket, the fork, the strainer and anything else with honey on it near your bee hive. The bees, bless them, will clean off every drop of honey. Take care to prop sticks or other escape avenues into any honey licks that might trap bees. Finally, return the empty frames to the honey super and put it back on the bee hive. And then, in beautiful, full circle Universe fashion, the cycle begins again.
© Jennifer S. and harvestliberty.net, 2012.
© 2015 Grateful Trees & Bees.
____________________________
(1) Berenstain, Stanley and Janice. The Big Honey Hunt. Random House, Inc.: New York, 1962.
